这玩意儿装逼利器啊羞
方法 1:使用经验证的电子邮件地址将您的内容与 Google+ 个人资料关联。
- 要确保你有一个帅气的脸作为 profile 相片
- 确保你的每一篇博客文章里有姓名显示 (例如 “by bigCat Mao”)
- 确保你的博客文章作者署名和 Google+ profile 姓名一致
- 使用同域名的邮箱地址进行验证 (例如 i@ooxx.me 搭配 http://bigc.at/readme )
然后在 https://plus.google.com/authorship 这里输入 email 地址,点 Signup for Authorship
我是还在 <head /> 里加了 <link rel=”author” href=”https://plus.google.com/116860638371403168572” /> 不知道有木有用,反正收到邮件说通过了
方法 2:通过将您的内容与自己的 Google+ 个人资料相关联来设置作者信息
- 在您的网页上创建指向您 Google+ 个人资料的链接,例如:
<a href="[profile_url]?rel=author">Google</a>
将其中的
[profile_url]替换为您的 Google+ 个人资料网址,例如:<a href="https://plus.google.com/116860638371403168572? rel=author">bigCat Mao</a>
您的链接必须包含
?rel=author参数。如果缺少该参数,Google 就无法将您的内容与 Google+ 个人资料关联。 - 向您刚更新过的网站添加可返回您个人资料的双向链接。
- 修改以下网站的撰稿者部分。
- 在显示的对话框中点击添加自定义链接,然后输入网站网址。
- 如果您愿意,也可以点击下拉列表指定可以看到此链接的人员。
- 要了解 Google 会从您的网页提取哪些作者数据,请使用结构化数据测试工具。
方法3:用插件
Google+ Author Information in Search Results
然后等上十天几个月
在快忘掉有这回事的时候,收到一封来自 Google Authorship Program <authorship-support@google.com> 的邮件
Welcome to Google Authorship!
《 “把你的博客和 Google+ profile 连起来” 》 有 20 条评论
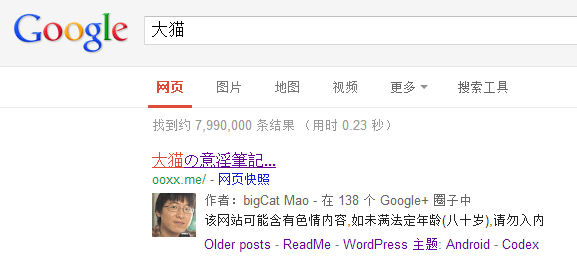
该网站可能含有色情内容~~~~~
搜索结果里的title亮瞎了。
@Andre 极度同意。
我也试了一下,现在正在等结果。
我看到了亮点。。。嘎嘎
人类你的搜索结果好厉害。。。 值得模仿。
怎么还评论不了了,学习了
邪恶的描述…
搞了。不知道神马时候能出现头像
大猫, 你好!
大猫你好,大猫再见。
唔。。确实挺好玩的
多长时间能显示在搜索页面?我等了花儿都谢了。
http://wordpress.org/extend/plugins/google-author-information-in-search-results-wordpress-plugin/ 试试这个插件
反正我的是一直没出现
@chonghua 我等了很久..
[…] 参考文献:http://bigc.at/authorship.orz […]
直接加一个链接就可以了
[…] 文章转载:http://bigc.at/authorship.orz […]
[…] 参考文献:http://bigc.at/authorship.orz […]